Back to CapitalForecastDirect Main Menu
Importing Needs
Needs represent an upcoming, or deferred, capital improvement for which you need to track an estimated cost. Needs can be added manually one-by-one, created by the model, or imported in batches. If you need to enter multiple needs manually, importing them can offer a quicker way to get that data into your account. You can import new needs and import updates to existing needs with this tool.
How to Import New Needs
To import new needs, you will use an Excel template available in your account to fill in the information that is necessary when adding a need.
Watch the Video Tutorial:

Downloading and Using the Template
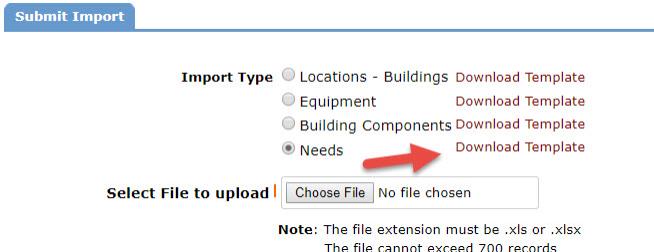
- Click on the Import Data link under the Information & Analysis section of your home page.
- Hover your mouse over the Shortcuts menu and click on Import.
- Click on the Download Template link next to Needs and open the file.
- The Needs Import Template spreadsheet will open in Excel. Each row in the spreadsheet will be a new need that is imported into your account and each column represents information that can be added to the need you are importing.
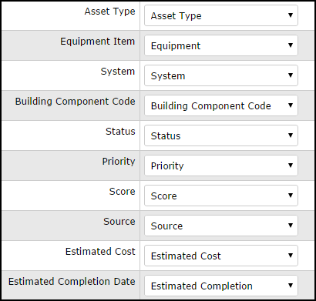
- The following fields are required and recommended when importing needs:
- Need ID- this field must be left blank when importing a new need. The system will generate a Need ID during the import.
- Description(required)- enter a narrative description of the need.
- Location(required)- enter an existing location from your CapitalForecastDirect account. *Note: Location must be entered exactly as seen in your account.
- Building - if you use Buildings you can enter one of your existing Building names here.
- Asset Type(required)- select Equipment when the need is related to a piece of Equipment, select Building Component when the need is related to a Building Component, or select None if the need isn't related to either.
- If you select Equipment, leave System (column H) and Building Component Code (column I) blank and enter the Equipment ID number in the Equipment column (required).
- If you select Building Component, enter the System (column H) and Building Component Code (column I) (required). Leave Equipment (column J) blank.
- If you select None, leave System (column H), Building Component Code (column I), and Equipment (column J) blank.
- Status- select the Status of the need.
- Priority(required)- select the Priority of the need.
- Estimated Cost- enter the Estimated Cost to complete the need.
- Estimated Completion- enter the Estimate Date the need will be completed. *Note: Must be entered as MM/DD/YYYY format.
- Justification- enter one of the existing Justifications in your account.
- Classification- enter one of the existing Classifications in your account.
- Type- enter one of the existing Types in your account.
- All other fields in the spreadsheet are additional information that can be added if desired.
- Save the template file as .xls or .xlsx. Name the file and save it in a location that is easily found on your computer.
Importing the Spreadsheet
- Click on the Import Data link under the Information & Analysis section of your home page.
- Hover your mouse of the Shortcuts menu and click on Import.
- Select Needs under Import Type.
- Search for the file that you saved and select it to upload.
- Make sure Sheet1 is entered in the Excel Sheet Name. This must match the name of the Excel worksheet in the saved file.
- Click Upload.
- On the Submit Import page, make sure the Field name and the Excel Column Names match.
- Click the Validate button at the bottom of the screen.
- When your file has been accepted on the Import Validation screen, click the Import Data button to import your needs.
How to Import Updates to Existing Needs
You may want to use the import tool if you need to batch update fields, such as Status when marking multiple Needs as Completed or Priority when changing all Roofing Needs from Medium to High. You will use the Needs Detail report to export your current data and import the updates.
Watch the Video Tutorial:

Running the Needs Detail Report
- Click on Report in the Actions menu and then click on Needs.
- Use steps 1-23 to filter for the needs that you want to update.
- In Step 24, choose Detail.
- In Step 25, choose Excel.
- In Step 26, click on Print.
- Open the file. This is the Needs Detail report that will act as your template when importing updates.
- The information from your existing needs will populate in the spreadsheet. It is important not to change the Need ID, Location, Building, Asset Type, Equipment, System Category, System, or Building Component as these fields are basic information for the need.
- Update the other fields as needed. *Note: If updating Estimated Cost and Estimated Completion for needs related to Building Components, you must set the Building Component controls to Manual on your spreadsheet. If these needs are controlled by the model, any changes you make to these fields will be overwritten by the model.
- Save the template file as .xls or .xlsx. Name the file and save it in a location that is easily found on your computer.
Importing the Spreadsheet
- Click on the Import Data link under the Information & Analysis section of your home page.
- Hover your mouse over the Shortcuts menu and click on Import.
- Select Needs under Import Type.
- Search for the file that you saved and select it to upload.
- Type Need Detail as the Excel Sheet Name. This must match the name of the Excel worksheet in the saved file.
- Click Upload.
- On the Submit Import page, make sure the Field name and the Excel Column Names match. Click the Validate button at the bottom of the screen.
- When your file has been accepted on the Import Validation screen, click the Import Data button to import your updates.
